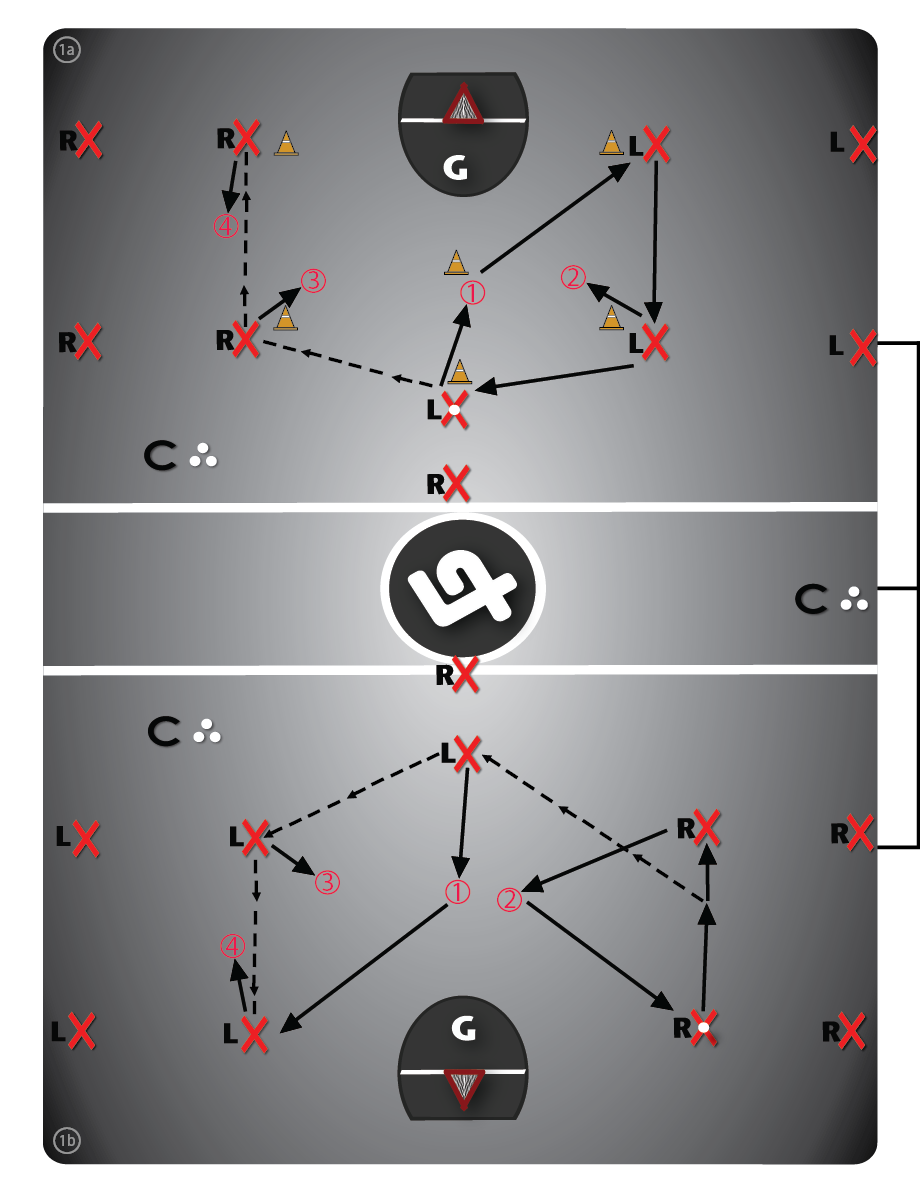
Offense Drill #0: Motion Offense – Skeleton (“Get It Low”)
 BEGINNER
-
- *Variation #1 (5 min): "Walk Through." Use pylons (or hula-hoops) as markers (5 standard offensive positions + middle) for beginners, in order to show them exactly where they need to cycle through on the floor. Basketballs may also be used in place of sticks and balls.
-
- Make sure to show both the strong-side lefty & strong-side righty scenarios, with the initial pass from the point player starting to the weak-side (Variation #1A) and later starting to the strong-side (Variation #1B). Goalies should be working on their footwork and tracking the ball.
-
- Motion/Look #1 happens after the point player (strong-side) passes to either shooter and then cuts the middle, eventually filling into the strong-side crease position (perhaps running around the net first). If this player is wide open they could in theory receive a give-and-go pass, but that is rarely the case.
-
- Next, the crease player should pop-out and the ball should then be passed low (deep), triggering Motion/Look #2 which is an off-ball "cut" from the far-side shooter position; this is the first read/look for the new ball carrier. If the "low pass" is denied by the defense, the ultimate goal is to "get it low" so the original ball carrier can just carry it low and switch positions with the crease player (who clears out).
After the off-ball shooter cuts they will either receive a pass, or if not fill into the crease position on the far-side, with the crease player filling up into the shooter position on that side of the floor.
If no pass is made, Motion/Look #3 is the next decision for the ball carrier to read, which is a cut from the player at the ball-side (same-side) shooter/point position, who looks for a give-and-go return pass; otherwise to seal the shooter position, or down-pick the crease position.
If none of those "looks" are open for the ball carrier they should fill/cycle up into the shooter position and take a shot (if it's there) or swing the ball to the far-side shooter/point (Motion/Look #4), repeating the process (if Intermediate level); otherwise going to the net one-on-one.
Throughout this process it is the ball carriers responsibility to have their head up, always being a threat as they methodically carry the ball from low to high, passing to any players who are wide open. (Draw Diagram)
*Variation #2 (7 min): "Dummy Defenders." Same as the above variation, the only difference is the pylons (or hula-hoops) are now "dummy defenders" positioned onto the floor as markers for players in order to emphasize the physical "battle" that may be required to get where they want to go; with players in the drill having to engage them as they pass by. Offenders become defenders then next time through and then exit the drill.
*Most common error = timing the cuts when the ball reaches the low position

Would you like to share your thoughts?
Your email address will not be published. Required fields are marked *
Leave a Reply
You must be logged in to post a comment.
Would you like to share your thoughts?
Your email address will not be published. Required fields are marked *
Leave a Reply
You must be logged in to post a comment.
0 Comments