Beginner Lacrosse Drills: Shooting
There are 2 styles of shot in lacrosse: shooting-on-the-run (which is the most frequent) & set-shooting (which is the focus of this article). Using a basketball analogy, for a set-shot think Steph Curry with his feet set, perfect balance, dropping a bomb from long range with perfect form. For a shot-on-the-run, picture Michael Jordan or Kobe Bryant slashing to the net and pulling up for an off-balance jump shot.
Set-Shooting sees the shooter start perpendicular to the net, taking a “crow hop” for extra power if “time & space is available
In lacrosse, when offenders get “time & space” in the prime scoring area, usually their first option is to take a “set-shot.” A good set-shot starts with a player standing perpendicular to the net, taking a baseball-like “crow-hop” if they have time, and then transferring their weight from their back foot forward onto their front foot; rotating their hips/shoulders (torso) and following through (shooting around the pipes). When set-shooting, remember the BEEF principles: Balanced (stance), Eyes (on target), Elbows (reaching back, tight to the body) and Follow Through (towards the target).
The following is a list of drill progressions we use at Laxlife.ca to teach set-shooting, all of which could also be used to teach shooting-on-the-run...
Drill #1: SEMI-CIRCLE (HORSESHOE) DRILL
SEE YOUTUBE VIDEO - Click Here

The horseshoe drill is a great starting point for teaching set-shooting to a large group. Although, if boards or a wall are available, doing a demo and then having players practice (warm-up) there for a couple of minutes before shooting on the net is usually best for beginners.
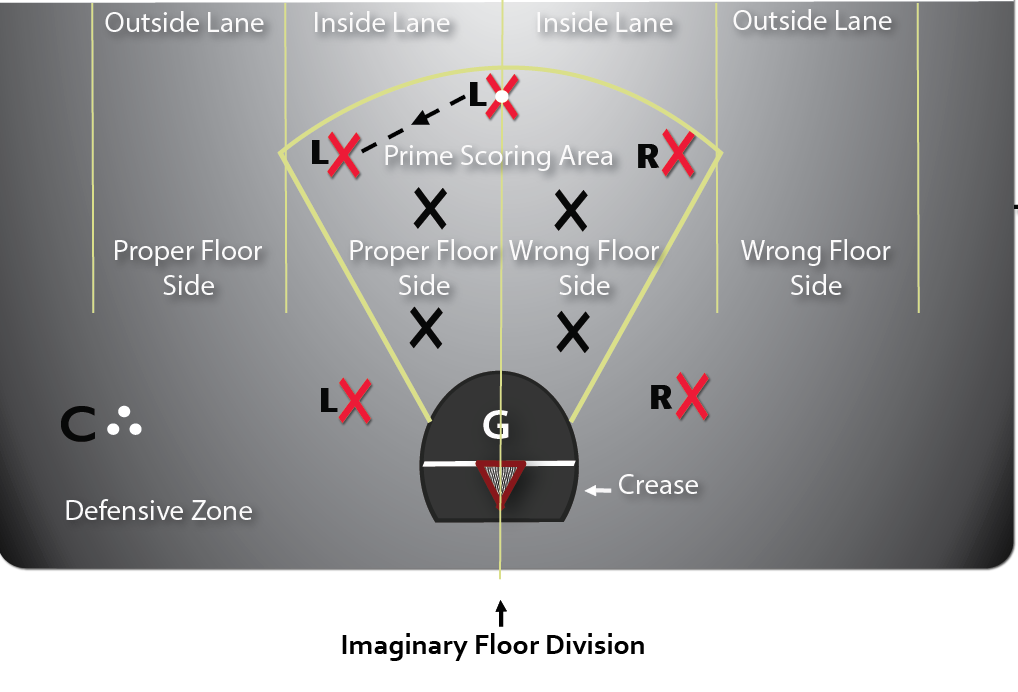
Using the net as a reference point helps teach players where they should be shooting from. In box lacrosse, players should always practice shots from inside of the "prime scoring area," on their "proper floor side."
The prime scoring area is defined as two imaginary diagonal lines going from each goal post outward on a 45° angle towards the side-boards. Just outside of the shooter position another imaginary semicircle (8-10 metres out from the top of the crease) connects to just outside of the other shooter position on the opposite side of the floor, forming an arc that ultimately connects to the diagonals (45°). Shots from this area are considered to be “high percentage,” as a higher percentage of goals are proven to go in from this area than anywhere else (consider duct taping this formation onto the floor during practice).
Prime Scoring Area

Players should also be sure to take shots from their proper floor side, defined as a lengthwise “imaginary division” of the floor, stretching from the middle of one net to the other; players’ sticks should be facing this imaginary midline for the large majority of the time while on the floor. Likewise, players’ bodies should rarely, if ever, cross this imaginary midline while shooting. Any shot on the “wrong floor-side” of this imaginary line is considered a bad shot, a win for the defense and a shot that the goalie should save.
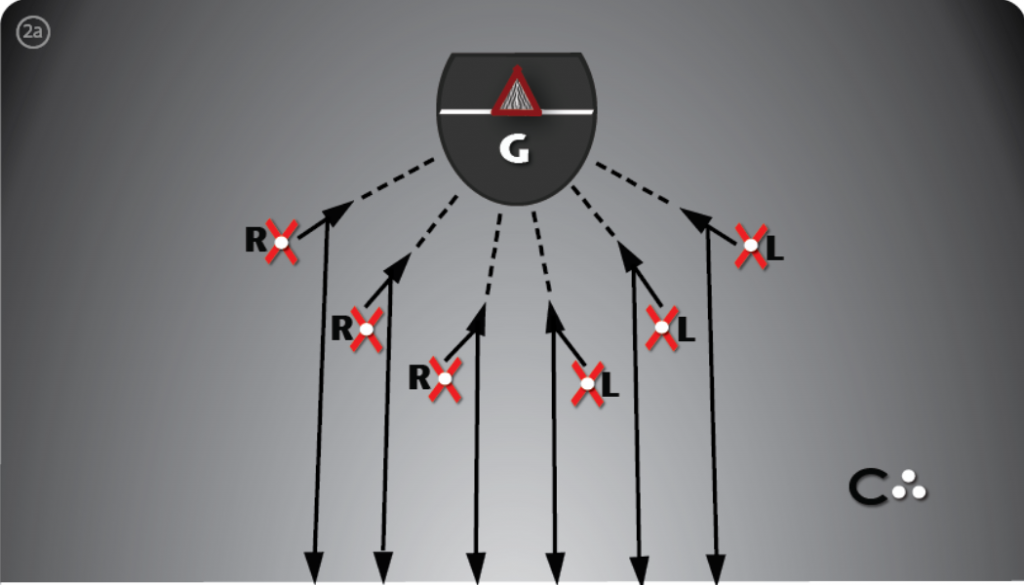
If there's no goalie in the "horseshoe drill," coaches can ask that players shoot "all at once," which gives beginners a chance to get lots of repetitions. Some common errors we tend to see in beginning players are: not reaching their arms back and loading their weight onto their back foot in their preliminary movements, not releasing the ball properly (too far in front or behind their body), taking their eyes off of the target, not shooting overhand, and/or not following through to the target (stopping short; abrupt follow through).
If there is a goalie, players can take turns shooting, working their way from one side to the other (left to right or right to left), with one second in-between shots. Another more advanced variation is to incorporate side-to-side shooting, switching from a left-handed to a right-handed shooter on each shot, which forces the goalies to have to reset on each shot and ultimately opens up more holes for shooters to try and expose.
Once players have developed sound shot mechanics, coaches can ask that players “react back” after shooting, sprinting the length of the floor (collecting a loose ball along the way if possible), and then lining up in the same formation in the opposite end of the floor; or just sprinting to the rag-line (lining up again in the same end).
Drill #2: STEP & SHOOT
SEE YOUTUBE VIDEO - Click Here
As players begin to stabilize their shot, footwork patterns should then be added before the set-shot takes place. The first footwork pattern, and generally the most common is the "L-Shot." The player takes a hitch-step ("jab-step") toward the board-side, planting off of their outside leg and cutting toward the middle (2-3 steps max), "setting" their feet ("perpendicular" to the net) for an outside shot. For beginners, it helps to put pylons on the floor to give a visual representation of the pattern. See the top half of the diagram below…
If per se, the L-shot didn't open up a lane for a shot, the next option in a game would be to either pass to someone, or drag (back-pedal) back towards their proper floor side. In the "drag shot" variation (see the bottom half of the diagram above), the player takes a jab-step toward the top-side (opposite of the L-shot), planting off of their inside leg and pivoting into a back-pedal ("drag") toward the "board-side." At this point the player should re-establish their momentum towards the net (north-south) and take a shot while still in the prime scoring area.
Drill #3: CAROUSEL & SHOOT
SEE YOUTUBE VIDEO - Click Here
To simply pass the ball across the top of the defense is generally an ineffective strategy for creating a quality shot in a set-offense. Most offensive systems in box lacrosse see the ball get passed low first, and then carried high. During this process the ball carrier should "be a threat" to shoot. To replicate this, the next drill variation sees the first player on one side of the floor carry the ball from low to high, from the crease position up to the shooter position, and then step into a set-shot.
For beginners, pylons may be used as a visual landmark for players to curl around, progressing to having their "head up" looking at the middle while "carrying high" (as opposed to looking at the pylon they are running towards). This forces players to have to work on changing their body momentum from one direction to the other, in a north-south orientation. In a game, players would be reading the defense and taking whatever ground they could get towards the middle of the prime scoring area.
Drill #4: CATCH & SHOOT (STATIONARY)
SEE YOUTUBE VIDEO - Click Here
The next progression after learning how to shoot with the ball already in your stick is effectively catching and shooting the ball as seamlessly as possible. The ideal catch and shoot scenario sees the ball in the air with the player about to receive it already "crow-hopping" towards the net, receiving the ball with arms fully extended behind their body, catching and shooting seemingly all in one motion (not quite a quick stick).
For first timers, coaches can underhand flip the ball to the player (with their hands), encouraging the player attempting to catch and shoot the ball without cradling (or twirling) their stick. If players are competent enough, they can pass lefties to righties & vice versa (as seen in the two diagrams below), working on the same mechanics as described above.
Drill #5: CATCH & SHOOT (DYNAMIC)
SEE YOUTUBE VIDEO - Click Here
The most advanced variation of shooting is for players to catch a lead pass in stride (gradually building up their running speed), shifting their momentum downhill (north-south) and taking a set-shot as quickly as possible upon receiving the pass (ideally all in one motion if it’s a good pass). This is the most game-specific shot and the model for what players should try to be able to execute consistently. See the diagram below…
CONCLUDING THOUGHTS
The final piece of the puzzle is knowing when to, and when not to shoot; otherwise known as shot selection. Shot selection is a mental process of either taking a shot or passing a shot up (not taking a shot). Being ready to shoot and in the “triple threat position,” is half of the equation. The other half depends on game-specific context variables, most notably: whether there is an open “shooting lane” toward the net and whether or not the shooter has "time & space." Too often, beginning lacrosse players will take the first shot available and not necessarily the best available shot (shot clock dependent).
Players must use good judgment before taking low percentage shots outside, or on the cusp of, the prime scoring area. It is usually better to “curl” out and look for a teammate who is in a better position, rather than take a low-percentage shot.
Shot accuracy and knowing where to shoot on a goalie is the final x-factor, and is usually the responsibility of coaches and “scouts,” although input from players and goaltenders are equally as important.
0 Comments